
- Free guide
The Speed Square: A Sawdust Scholars Field Guide

Guided by Squarey · written by Shaun
Why every carpenter carries one
A speed square is a small triangle that does the job of five tools: a try square, a miter square, a protractor, a saw guide and a rafter calculator. It costs less than lunch, fits in a back pocket, and almost never wears out.
If you learn only one layout tool well, make it this one. This guide walks you from "what is this thing?" to laying out rafters, with practice drills at the end.
What a speed square is
A speed square is a right triangle with a raised lip on one side. Albert J. Swanson invented it in 1925 to speed up rafter layout, which is where the name comes from. Most come in two sizes: 7 inch (the everyday pocket size) and 12 inch (for wide stock like 2x10s and 2x12s).
Anatomy
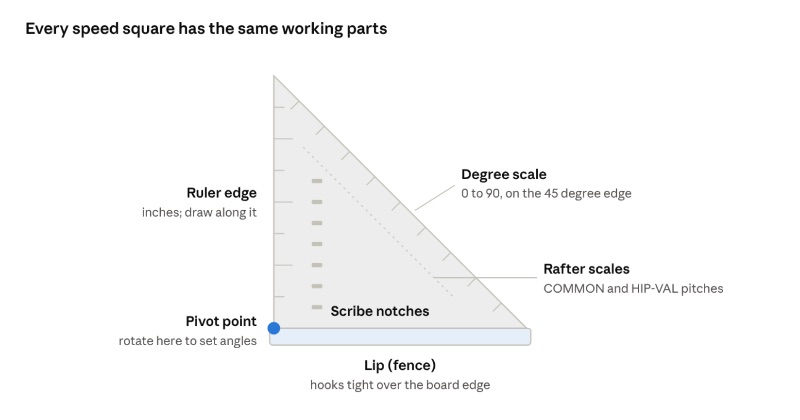
Hold the square with the lip hanging down and the long slanted side facing away from you. Here is what you are looking at:
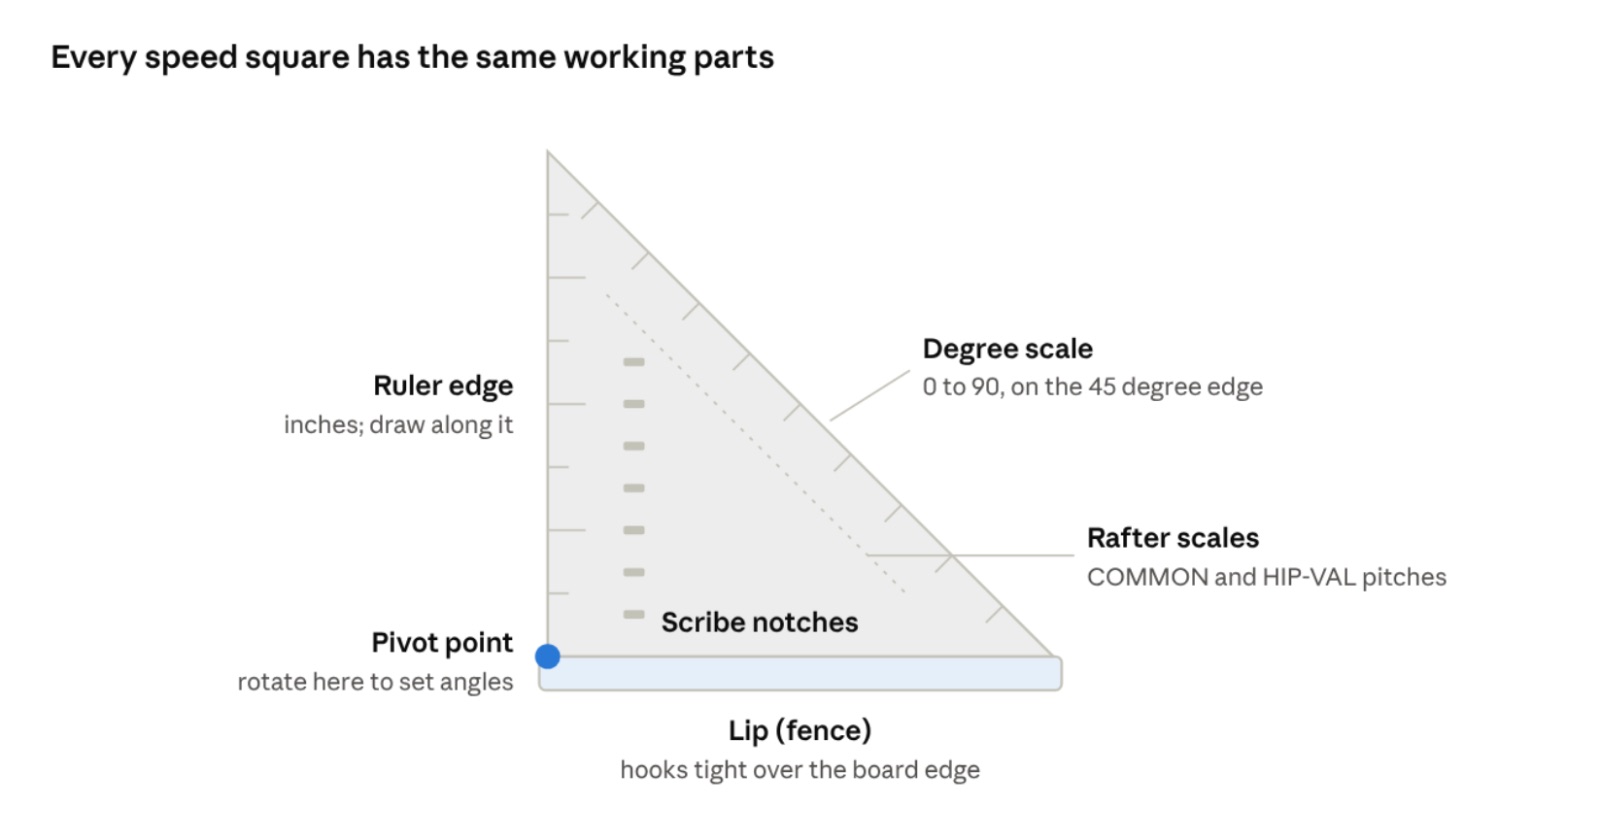
Speed square anatomy · 7 parts
The pivot sits at the corner where the lip meets the ruler edge; everything else is read from there.
| Part | Where it is | What it does |
|---|---|---|
| Lip (fence) | Thick ridge along one short side | Hooks over the board edge so the square sits perfectly square to it |
| Pivot point | The right-angle corner where the lip meets the ruler edge, usually stamped PIVOT | The point you rotate around to set any angle |
| Ruler edge | The other short side, marked in inches | Measures, and is the edge you draw along for square and angled lines |
| Degree scale | Along the long slanted side (hypotenuse), 0 to 90 | Reads angles when you rotate the square on the pivot |
| COMMON scale | Numbers 1 to 30 near the degree scale | Roof pitch in inches of rise per 12 inches of run, for common rafters |
| HIP-VAL scale | A second row of pitch numbers | The same pitches, adjusted for hip and valley rafters |
| Scribe notches | A row of small slots inside the square, usually every 1/4 inch | Hold a pencil tip to draw lines parallel to an edge |
| 45 degree edge | The hypotenuse itself | Draws a 45 degree line in one move |
Scales vary a little by brand, so take two minutes to match these parts to your own square.
The three everyday jobs
These three uses cover most of what you will do with a speed square on any job site.
1. Marking a square (90 degree) line
- Hook the lip tight against the edge of the board.
- Slide the square to your measurement mark.
- Draw along the ruler edge. That line is exactly 90 degrees to the edge.
Tip: draw a small V at your measurement first, then put the ruler edge right on the point of the V. Your cut will land where you meant it to.
2. Marking a 45 degree line
- Hook the lip against the board edge.
- Draw along the long slanted side (the hypotenuse).
Flip the square over to get the 45 going the other direction. This is the fastest way to lay out corner braces, blocking and trim miters.
3. Guiding a circular saw
A speed square makes a dead-straight crosscut fence for a circular saw.
- Mark your cut line. Line up the saw blade with the waste side of the line.
- Position the square. Slide the square's ruler edge against the left side of the saw's base (shoe), with the lip hooked over the far edge of the board.
- Hold it firm. Press the lip firmly into the board with your free hand, well back from the blade.
- Make the cut. Pull the saw back slightly, start it, and push it through while the shoe rides along the square.
Safety: keep the hand holding the square behind the square, never in front of the blade path. Clamp short or narrow pieces instead of holding them.
Marking any angle with the pivot
The pivot point turns your speed square into a protractor you can draw with. Here is how to mark any angle from 0 to 90 degrees.
- Set the pivot. Put the pivot point on the edge of the board, right at your mark.
- Hold it steady. Hold the pivot in place with a finger and rotate the square.
- Watch the scale. Watch the degree scale on the slanted side. Stop when your angle number lines up with the same board edge the pivot is on.
- Draw the line. Draw along the ruler edge.
The number you read is how far the line is off square, which matches the way miter saws are labeled. A reading of 0 gives a square line; a reading of 30 gives a line 30 degrees off square, ready for a 30 degree miter cut.
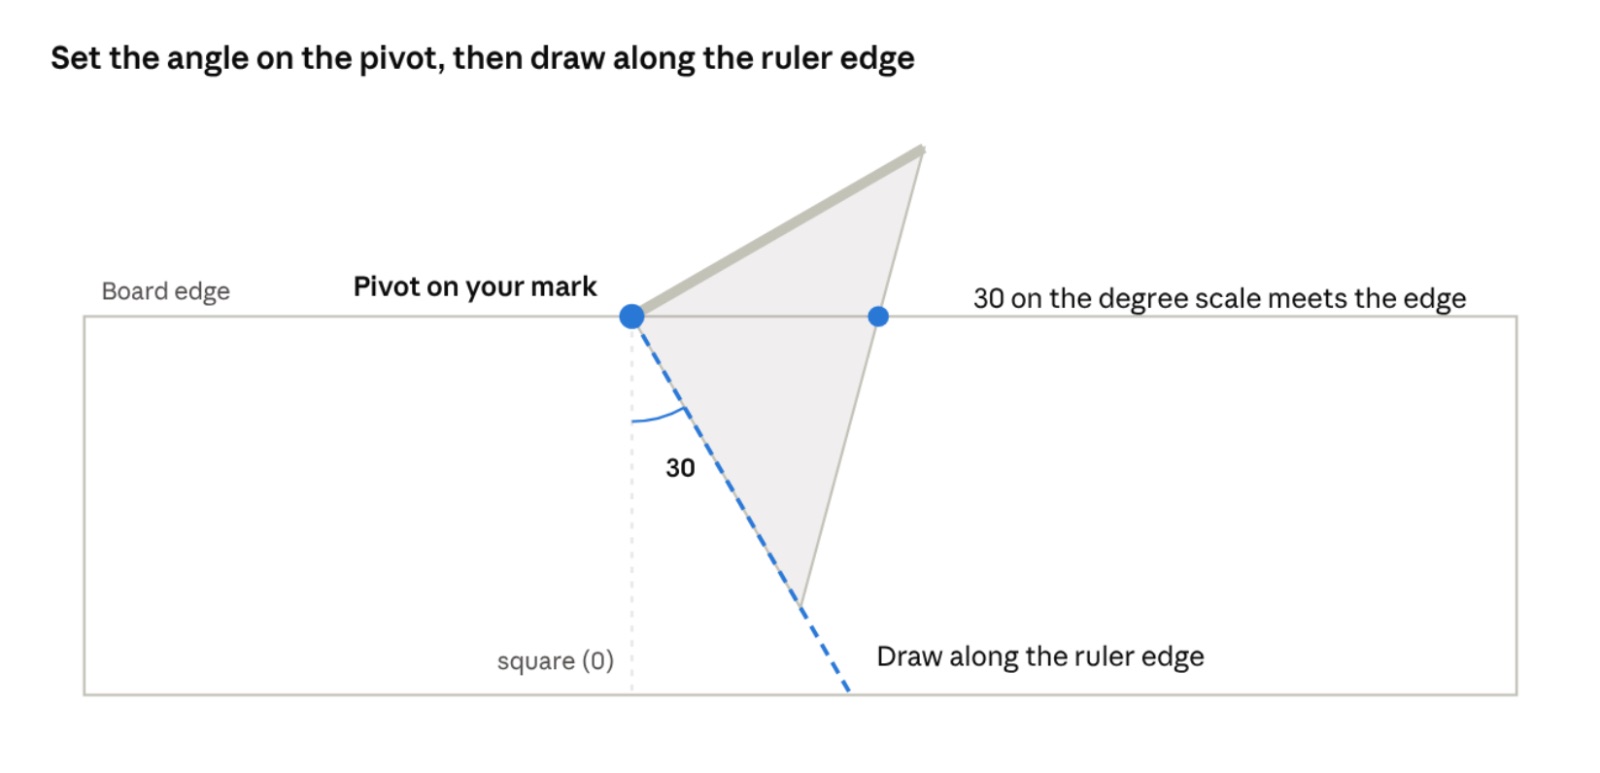
Marking a 30 degree line with the pivot
Hold the pivot still, swing the square until 30 meets the board edge, and the ruler edge gives you a line 30 degrees off square.
Reading an existing angle
You can run this in reverse. Put the pivot on a board edge, rotate the square until the ruler edge lines up with an existing cut, and read the number where the slanted side crosses the board edge. Handy for copying an angle off old work or checking a cut you just made.
Common angles worth memorizing
- 22.5 degrees: octagon corners and two-piece 45 degree turns in trim
- 30 and 60 degrees: hexagons and many brace layouts
- 45 degrees: box corners and most braces (no rotating needed, use the hypotenuse)
Roofing: what the square was built for
The COMMON and HIP-VAL scales let you mark rafter cuts straight from the roof pitch, with no math.
Pitch in one sentence
Roof pitch is rise over run: how many inches the roof climbs for every 12 inches it travels sideways. A 6/12 roof rises 6 inches per foot of run. Those pitch numbers are what the COMMON scale is marked in.
Marking the plumb cut on a common rafter
The plumb cut is the vertical cut where the rafter meets the ridge board.
- Position the pivot. Lay the rafter flat. Put the pivot on the top edge at the ridge end.
- Set the pitch. Rotate the square until your pitch number on the COMMON scale lines up with that same top edge.
- Draw the line. Draw along the ruler edge. That line will stand perfectly vertical once the rafter is installed.
Remember to subtract half the ridge board thickness from the rafter length before you cut.
Marking the seat cut (birdsmouth)
The birdsmouth is the notch that lets the rafter sit on the wall plate. It has two lines: a plumb line (the heel) and a level line (the seat).
- Mark the heel. Mark a plumb line at the wall position, using the same steps as the ridge cut.
- Mark the seat. Lay the square's ruler edge right on that plumb line and draw along the lip side. That line is square to the plumb line, which means it is level once installed.
- Set the depth. Set the seat width to match the wall plate (3 1/2 inches on a 2x4 wall, 5 1/2 on a 2x6).
Rule of thumb: do not notch deeper than one third of the rafter's width, or you weaken it. Always follow the plans and local code for your project.
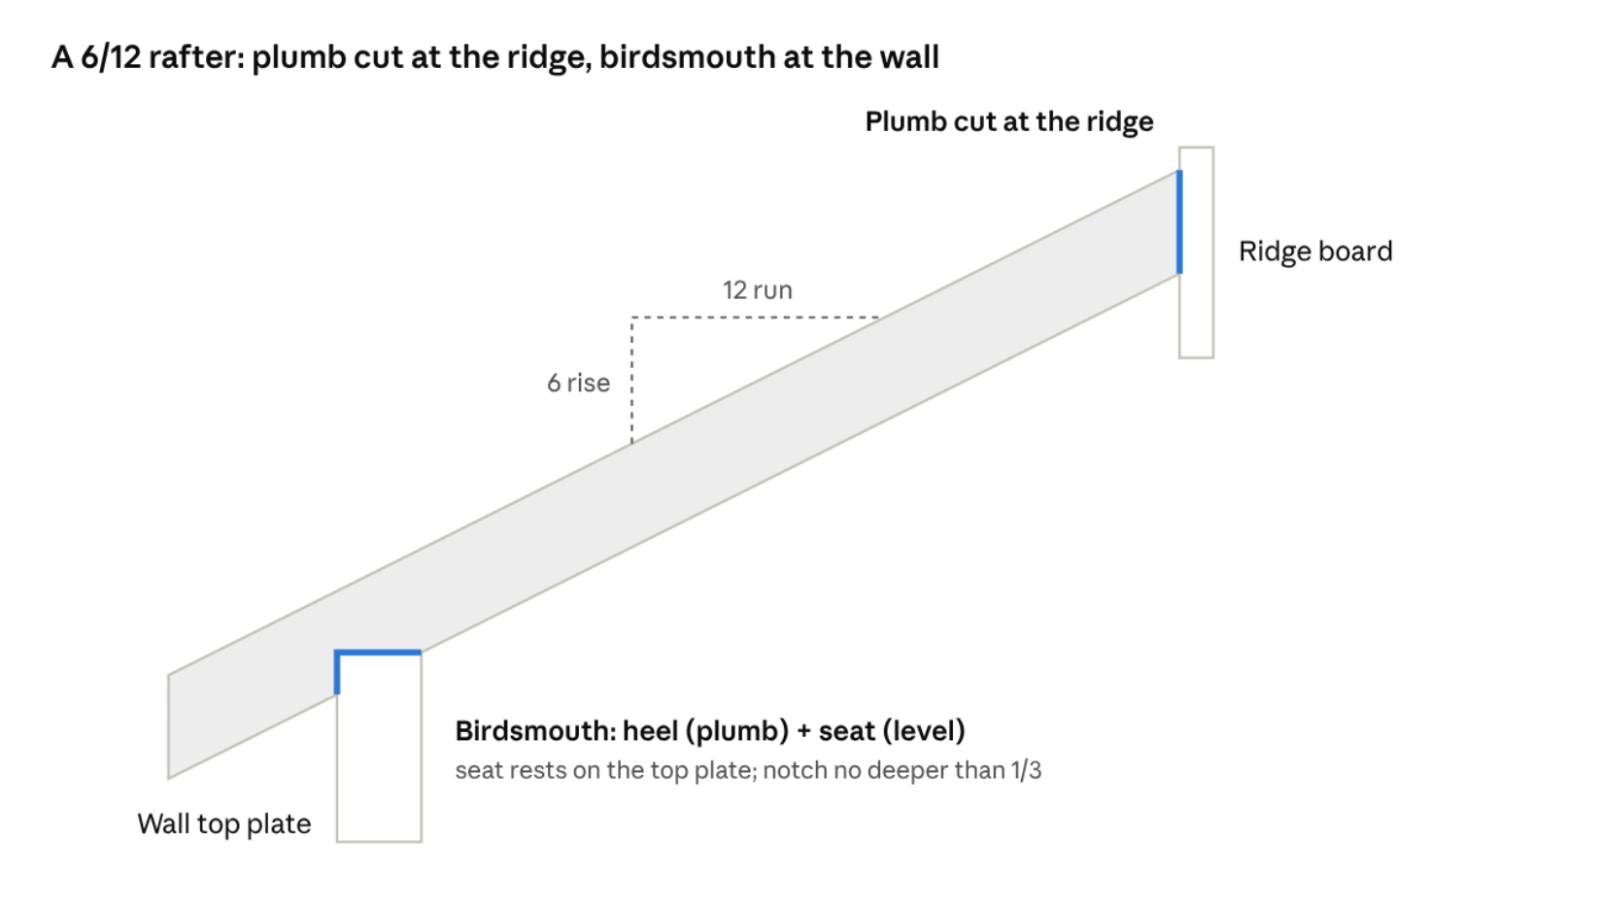
Common rafter cuts on a 6/12 roof
Both plumb lines come from the same square setting; the seat is simply square to the heel.
Hip and valley rafters
On a roof where all sides share the same pitch, mark hip and valley plumb cuts the same way, but line up your pitch number on the HIP-VAL scale instead. That scale accounts for the hip running diagonally, 17 inches of run for every 12 on the common rafters.
Finding the pitch of an existing roof
- Hold the pivot. Hold the pivot against the bottom edge of a rafter (or the underside of the roof deck at the eave).
- Rotate to plumb. Rotate the square until the ruler edge is plumb. Check it with a torpedo level.
- Read the scale. Read the COMMON scale (pitch) or degree scale (angle) where the square crosses the rafter edge.
This is great for additions, sheds and porch roofs that need to match the house.
More ways it earns its spot in your pouch
Drawing rip lines with the scribe notches
Need a line 1 3/4 inches in from the edge, down the whole length of a board? Put your pencil tip in the 1 3/4 notch, hook the lip on the edge, and slide the square and pencil together down the board. You get a perfectly parallel line for ripping, marking a reveal, or laying out a dado.
Gang-marking wall plates
When framing a wall, lay the top and bottom plates side by side and mark stud locations across both at once with the ruler edge. Every stud lands in the same spot top and bottom, so the wall goes together square.
Checking your saws
With the saw unplugged, set the square against the blade to check that a table saw, miter saw or circular saw is truly at 90 or 45 degrees. Rest it on the plate, not the teeth. A quick check before a big cut list saves a lot of wood.
Checking cuts and corners
Hold the inside corner of the square into a joint or the end of a cut board. Light showing through means it is out of square.
Rough stair angles
A framing square with stair gauges is the right tool for stringers, but a speed square is handy for finding the stair angle. For a 7 inch rise and 11 inch run, the angle is about 32.5 degrees. Use the pivot to mark it on handrail parts, skirt boards and balusters.
A hand-saw and chisel guide
Clamp or hold the square on your line and run a hand saw or a chisel's flat back along the ruler edge. It keeps a beginner's cut square through the full depth of the board.
A short straightedge and ruler
The ruler edge handles quick measurements under 7 inches (or 12 on the big one), so you are not pulling your tape for every small mark.
Buying, care and common mistakes
What to look for
| Feature | Pick this | Why |
|---|---|---|
| Size | 7 inch first; add a 12 inch later | The 7 inch fits a tool belt; the 12 inch spans 2x10 and 2x12 rafters |
| Material | Cast or extruded aluminum | Light, rigid, survives drops; plastic is fine for a shop drawer but flexes |
| Markings | Etched or stamped | Painted numbers wear off within a season of real use |
| Lip | Thick and straight on both faces | A thin or warped lip throws every line off |
| Scales | Degree, COMMON and HIP-VAL | You will grow into the roofing scales |
Check a new square for accuracy: draw a line along the ruler edge with the lip on a straight board, flip the square over, and draw again from the same point. If the two lines don't match, return it.
Care
- Do not use it as a hammer or pry bar. A dented lip means bad lines.
- Keep it out of the bottom of the tool bucket where it gets banged around.
- Wipe off glue and sap so the lip seats flat.
- Re-check it with the flip test after a hard drop.
Mistakes beginners make
- Letting the lip float off the edge. Keep it pressed tight, or the line drifts.
- Drawing with a fat pencil. Use a sharp carpenter's pencil or a mechanical pencil.
- Reading the wrong scale. Degrees and COMMON pitch numbers sit side by side; double-check which one you lined up.
- Cutting on the wrong side of the line. Mark the waste side with an X before you cut.
- Using the 7 inch square on wide boards. If the ruler edge doesn't reach across, flip the square and extend the line from the other edge, or grab the 12 inch.
Quick reference and practice drills
Roof pitch to degrees
| Pitch (rise/12) | Angle (degrees) | Typical use |
|---|---|---|
| 2/12 | 9.5 | Low-slope porches, sheds |
| 3/12 | 14.0 | Minimum for most shingles |
| 4/12 | 18.4 | Ranch homes, garages |
| 5/12 | 22.6 | Common residential |
| 6/12 | 26.6 | Common residential |
| 7/12 | 30.3 | Common residential |
| 8/12 | 33.7 | Steeper homes |
| 9/12 | 36.9 | Steep, usable attic |
| 10/12 | 39.8 | Steep |
| 12/12 | 45.0 | Cape Cods, A-frames start here |
The math behind it: angle = arctan(rise ÷ 12).
Practice drills (one scrap 2x4, 20 minutes)
- Mark and cut five square lines. Stack the pieces and check that the ends line up flat.
- Mark a 45 using the hypotenuse, then mark another 45 with the pivot at the 45 reading. They should match.
- Mark 22.5 degrees on two pieces, cut them, and join them. They should make a 45 degree turn.
- Draw a rip line at 1 1/2 inches using the scribe notches.
- Make three crosscuts using the square as a circular saw guide.
- Lay out a 6/12 plumb cut and birdsmouth on a scrap 2x6.
- Find the pitch of a real roof: a shed, garage or porch.
Keep this guide handy and come back to it. A speed square gets faster the more you use it, just like the name says.
Reviews & build photos
No reviews yet. Built this one? Be the first to share how it went!
Write a review
Thank you! Your review of The Speed Square: A Sawdust Scholars Field Guide will appear after a quick check.
Found a mistake or have an idea for this guide?Tell us — we fix and improve plans based on your feedback.
Want to know when new designs and guides come out?
Join our mailing list for new plans, free guides and project ideas. For parents and teachers. No spam, unsubscribe anytime.