
- Free guide
How to Set Up and Use the Stanley Deluxe Clamping Miter Box

Guided by Squarey · written by Shaun
Why this miter box
The Stanley Deluxe Clamping Miter Box (model 20-600 / 20-600D) lets you cut clean 90°, 45° and 22.5° angles by hand, no power saw needed. It comes with a 14 in. back saw and two cam pins that clamp your work to the base.
This guide walks you through setting it up, making your first cut, and keeping it accurate. It's written for teachers, group leaders, parents and the young builders they work with. A grown-up should read it through first, then work through it together at the bench.
Safety first
A grown-up supervises every step, and everyone at the bench wears safety glasses.
- Clamp the wood with the cam pins before every cut. Hands never hold small pieces near the saw.
- Hands stay on the saw handle and the far side of the box, never in front of the blade.
- Store the saw with its blade guard on, out of reach of younger kids.
- Take breaks. Tired hands slip, and a good cut is never a race.
Key features
Know these parts before you cut. Each one solves a common hand-sawing problem.
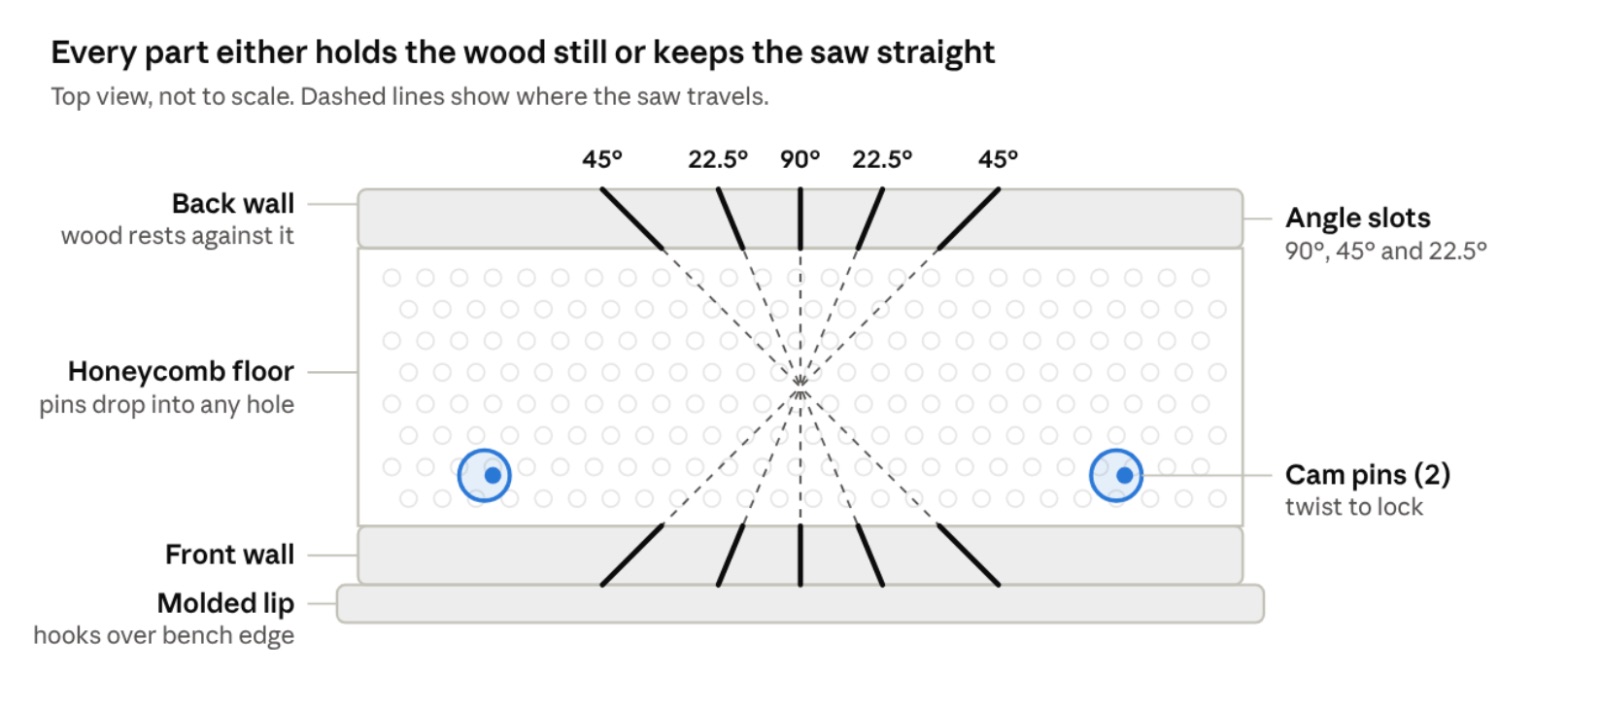
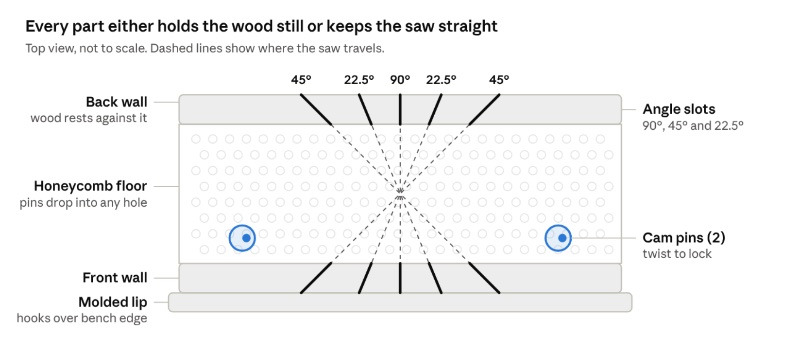
Miter box parts · top view
The walls guide the saw through the angle slots, and the cam pins lock into the honeycomb floor to hold your wood.
| Feature | What it does | Why it matters |
|---|---|---|
| Precut angle slots | Guide the saw at 90°, 45° and 22.5° | 22.5° cuts make eight-sided shapes, like octagon frames and planters |
| Honeycomb base | A grid of holes across the cutting floor | Lets you place the clamp pins almost anywhere, for narrow or wide stock |
| Two cam pins | Drop into the honeycomb and twist to lock | Pinch your workpiece against the back wall so it can't creep |
| Built-in saw stop | Keeps the saw from cutting into the box floor | Protects the box so your slots stay accurate longer |
| Molded lip on the base | Hooks over the front edge of a bench or table | You can cut without screwing the box down |
| Mounting holes | One screw hole on each side of the base | Anchor it to a workbench or a scrap board for steadier cuts |
| Storage compartments | Molded pockets in the box | Hold the cam pins and a pencil so they don't wander off |
| 14 in. back saw | 13 teeth per inch, stiffened spine | Fine teeth leave a smooth edge on trim and molding |
The box is molded from high-impact polypropylene and weighs about 2.5 lb, so it's easy to carry between the classroom, club room and kitchen table. Overall it runs about 14.5 in. long by 7 in. wide.
What you'll need
- The miter box, saw and both cam pins (all in the package)
- A sturdy bench or table at about waist height for your builder
- A pencil and a tape measure
- A combination or speed square to check your cuts
- Two wood screws (optional, for mounting)
- Safety glasses for everyone at the bench, grown-ups included
- Scrap wood the same size as your project, for test cuts
- Sandpaper (120–180 grit) for cleaning up edges
Setting it up
Setup takes about five minutes. The goal is a box that doesn't slide and a saw that moves freely.
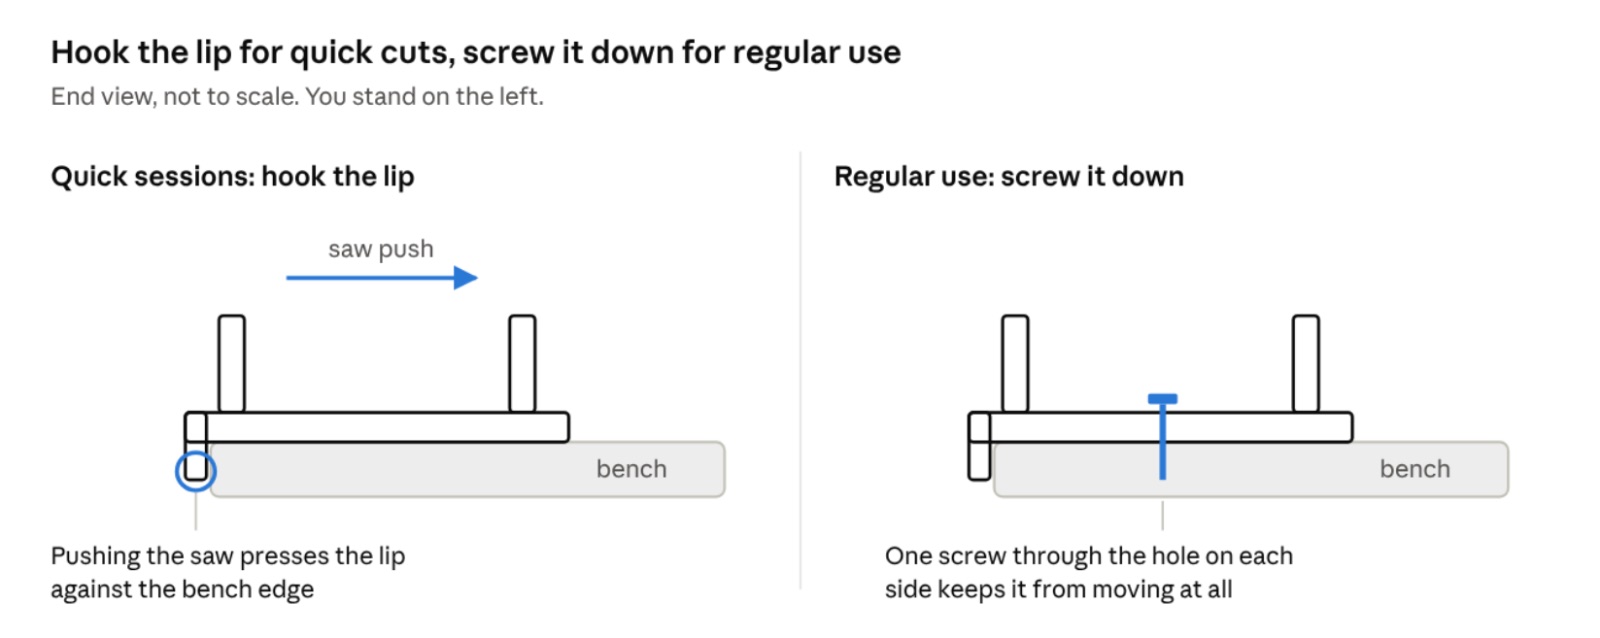
Two ways to hold the box · end view
The lip works because every push stroke drives the box into the bench edge. Screws are the steadier choice for younger builders or a box that stays at one bench.
- Unpack and check the parts. You should have the box, the saw and two cam pins. A grown-up should remove the plastic blade guard from the saw, since the teeth are sharp. Keep the guard for storage.
- Pick your work surface. Choose a flat, solid bench or table. A wobbly surface will throw off every cut.
- Choose how to hold the box.
- Quick sessions: Hook the molded lip over the front edge of the bench. Pushing the saw forward presses the box against the edge.
- Regular use or younger builders: Drive one wood screw through the hole on each side of the base into the bench or a scrap board.
- Store the pins and pencil. Snap the cam pins and a pencil into the molded storage pockets until you need them.
- Test the saw in each slot. Slide the saw into the 90°, 45° and 22.5° slots. It should move smoothly without binding.
Making your first cut
Mark, clamp, start slow, then let the saw do the work. Practice these steps on scrap first.
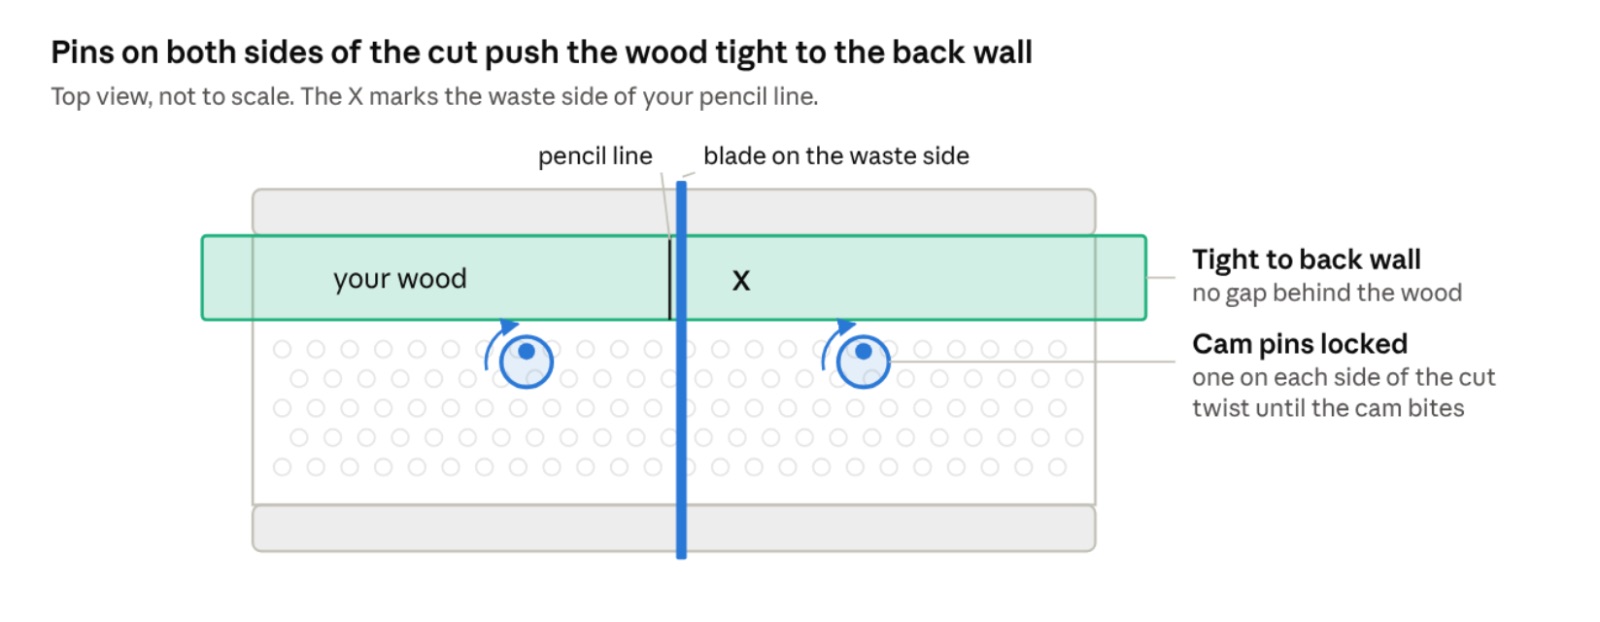
Clamped and ready to cut · top view
This is what steps 2 through 4 should look like before you start sawing.
- Measure and mark. Measure your piece and draw a clear line where you want to cut. Add a small "X" on the waste side of the line.
- Place the wood in the box. Lay it flat on the honeycomb floor and push it tight against the back wall. Place the side you want to show facing up.
- Line up your mark. Slide the wood until your pencil line sits right at the slot you'll use. The saw blade should land on the waste side of the line.
- Clamp it with the cam pins. Drop a pin into the honeycomb hole closest to the front of your workpiece, on each side of the cut. Twist each pin until its cam presses the wood firmly against the back wall.
- Wiggle test. Try to move the wood with your hand. If it shifts, move the pins to a closer hole and twist again.
- Start the cut. Set the saw in the slot. Pull it back toward you a few times with light pressure to start a groove.
- Saw with long, even strokes. Use the full length of the blade. Push gently and let the teeth cut; don't force it down. Your free hand stays on the far side of the box, never in front of the blade.
- Finish gently. Ease up on the last few strokes so the wood doesn't splinter. The saw stop keeps you from cutting into the floor.
- Unclamp and check. Twist the pins loose, remove the piece and check the angle with your square. Lightly sand any fuzz off the edge.
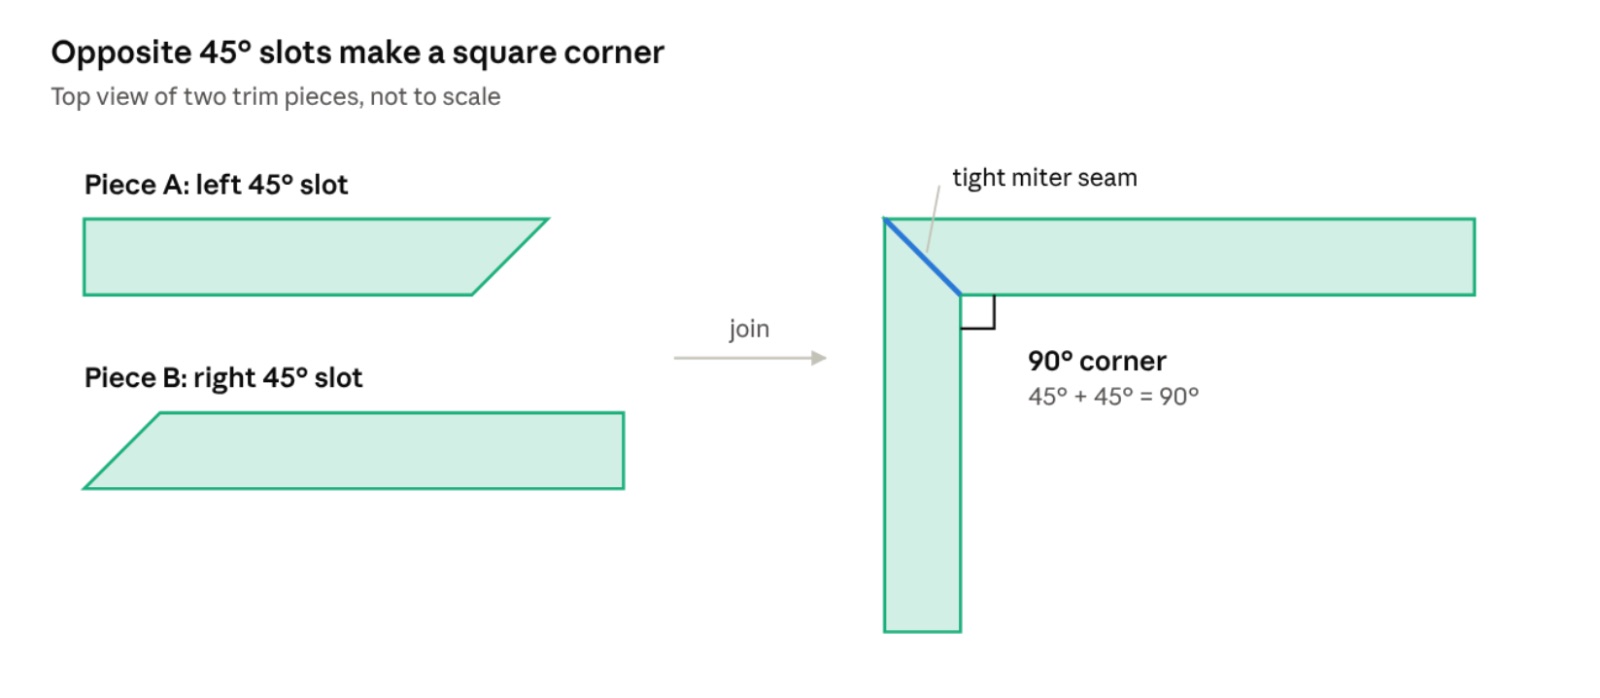
Pairing 45° cuts · top view
If the seam gaps at the front or back, one piece was cut in the wrong slot or the wood shifted during the cut.
Squarey's Tips
Squarey's top tricks for straighter, cleaner, more accurate cuts.
- Cut on the waste side. The blade removes about 1/16 in. of wood. Saw beside your line, not on it, so your piece stays the right length.
- Cut long, then trim. Cut a piece slightly long, test the fit, then shave it down. You can always take more off, but you can't put it back.
- Back up thin trim. Set a scrap strip under or behind thin molding. It supports the fibers and stops tear-out on the back edge.
- Clamp round stock too. The cam pins can hold round pieces like PVC pipe or dowels. Set the pins close so the piece can't roll.
- Mark which way the angle goes. Before cutting a miter, sketch the angle on the wood. It's easy to cut a 45° the wrong direction.
- Use 22.5° for octagons. Eight pieces cut at 22.5° on both ends make an octagon. Great for frames, planters and coasters.
- Mark your stroke. Put a strip of tape on the saw blade near the handle end. It reminds you to use the full blade for faster, smoother cuts.
- Don't force it. If the saw gets hard to push, you're pressing too hard. Lighten up and the teeth will bite better. A little candle wax on the blade helps it glide, especially for smaller arms.
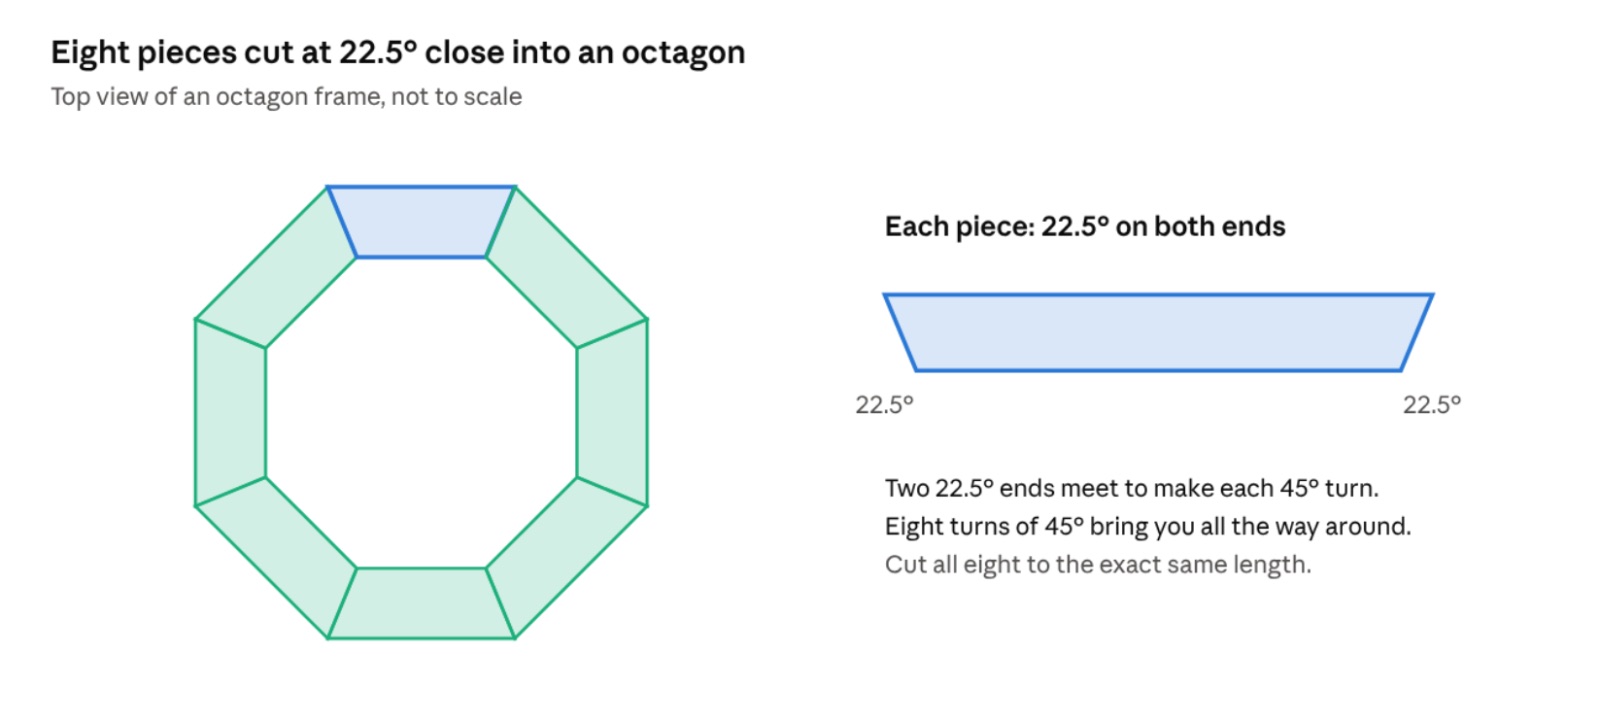
Building an octagon with the 22.5° slots
Squarey's favorite project for the 22.5° slots: cut one end in the left 22.5° slot and the other end in the right 22.5° slot, so both ends angle inward.
Care and troubleshooting
A little care keeps the slots tight and the saw sharp for years.
Care
- Brush sawdust out of the slots and honeycomb after each project.
- Put the blade guard back on the saw and store it out of reach of younger kids.
- Wipe the blade with a light coat of oil if you store it somewhere damp.
- Keep the cam pins in their storage pockets so you don't lose them.
Troubleshooting
| Problem | Likely cause | Fix |
|---|---|---|
| Cut isn't square | Wood shifted, or wasn't tight to the back wall | Re-clamp with pins closer and push stock firmly against the back |
| Miter corner has a gap | Pieces cut in the wrong slots, or wood shifted | Recut using opposite 45° slots and re-clamp before cutting |
| Ragged or splintered edge | Pressing too hard, or no backing | Lighten pressure, ease off at the end, add a scrap backer |
| Saw binds in the slot | Sawdust buildup, or forcing the saw | Clear the slot and use long, light strokes |
| Box slides while cutting | Lip not hooked, or surface slippery | Hook the lip on the bench edge or screw it down |
Reviews & build photos
No reviews yet. Built this one? Be the first to share how it went!
Write a review
Thank you! Your review of How to Set Up and Use the Stanley Deluxe Clamping Miter Box will appear after a quick check.
Found a mistake or have an idea for this guide?Tell us — we fix and improve plans based on your feedback.
Want to know when new designs and guides come out?
Join our mailing list for new plans, free guides and project ideas. For parents and teachers. No spam, unsubscribe anytime.